MPI Quick Start Tutorial
The goal of this tutorial is to provide a high-level introduction to GitLab CI/CD that helps individuals get started in 30 minutes and provide a basic understanding of the HPC focused enhancements. Though geared toward beginners this documentation does assume a basic familiarity with GitLab.
If you are unfamiliar with GitLab or would like to start by developing a deeper understanding of the tools there are several other resources we can recommend. The official getting started with CI/CD guide is a great resource. It also has the the added bonus it can be completed with resources freely available on GitLab.com.
Introduction
The ECP Software Deployment Team is working towards enabling both cross site as well as internal continuous integration (CI) for approved code teams. When fully operational your code can be compiled and tested with greatly minimized interactions using a central GitLab instance. There are also many internal instances of GitLab that are available to use today, with access to an internally managed set of resources. This guide provides all the necessary details to create a MPI “hello world” example that will be ran in a CI pipeline. There are both generalized as well as site specific details include in order to best support wherever you attempt this tutorial.
Why GitLab CI/CD?
CI/CD is short for Continuous Integration / Continuous Delivery or Continuous Deployment. It can provide teams a configurable, automated, and repeatable process to build/test their code. Though there are a number of available CI/CD solutions the ECP Software and Facility teams have chosen to use GitLab CI/CD. We highly recommend that if you encounter any issues or detailed questions during this tutorial to check the official documentation. We will take special care to highlight changes directly associated with running on facility resources as these won’t be reflected in other documentation sources.
Basics of GitLab CI/CD
In this Quick-Start Guide, we use a simple “hello, world” example, with MPI
and MPI+OpenMP C codes. Our repository will need to have the
required source code to build, the same as any other repository.
The difference is that we must also define a .gitlab-ci.yml
file. This file acts as the instructions for GitLab to build and execute
your CI pipeline.
The steps that the pipelines execute are called jobs. When you group a series of jobs by those characteristics it is called stages. Jobs are the basic building block for pipelines. They can be grouped together in stages and stages can be grouped together into pipelines.
In our example pipeline we are going to focus on create two stages; build and then test. The build stage will, as the name implies, build our MPI application using an available software environment wherever my job is executed. While in the test stage we will request compute resources to execute our newly created binaries using the Batch executor. Our example is incredibly simply and depending on the scale/complexities of your planned CI/CD process there are wealth of features you can decide to leverage we simply don’t touch upon in this tutorial.
Getting Started
To get started you will require access to a GitLab repository as well as a GitLab runner that has been registered with that instance. If you have access to a facility GitLab instance than you should be ready to go. Begin by creating a new project. The name doesn’t matter and since this is a test project and you can leave the visibility to private. From this point it is possible to manage files using a tradition Git workflow but alternatively you can also choose to use the GitLab Web IDE.
Setting up your repository
Now that you have an empty project you will need to create three separate files.
hello_mpi.c
#define _GNU_SOURCE

#include <utmpx.h>
#include <stdio.h>
#include <unistd.h>
#include <stdlib.h>
#include "mpi.h"

int main (int argc, char *argv[]) {
  int           my_rank=0;
  int           sz;
  int sched_getcpu();
  int cpu;
  char hostname[MPI_MAX_PROCESSOR_NAME]="UNKNOWN";

  cpu = sched_getcpu();

  MPI_Init(&argc, &argv);
  MPI_Comm_rank(MPI_COMM_WORLD, &my_rank);
  MPI_Get_processor_name(hostname, &sz);

  printf("Hello, from host %s from CPU %d  rank %d\n", hostname, cpu, my_rank);

  if (argc > 1)
    sleep (atoi(argv[1]));

  MPI_Finalize();

  return 0;
}
hello_mpi_omp.c
#define _GNU_SOURCE

#include <utmpx.h>
#include <stdio.h>
#include <omp.h>
#include <unistd.h>
#include <stdlib.h>
#include "mpi.h"

int main (int argc, char *argv[]) {
  int           my_rank=0;
  int           sz;
  int sched_getcpu();
  int cpu;
  int thread_id;
  char hostname[MPI_MAX_PROCESSOR_NAME]="UNKNOWN";

  MPI_Init(&argc, &argv);
  MPI_Comm_rank(MPI_COMM_WORLD, &my_rank);
  MPI_Get_processor_name(hostname, &sz);

  #pragma omp parallel private(cpu,thread_id)
  {
     thread_id = omp_get_thread_num();
     cpu = sched_getcpu();
     printf("Hello, from host %s from CPU %d  rank %d thread %d\n", hostname, cpu, my_rank, thread_id);
     if (argc > 1)
        sleep (atoi(argv[1]));
  }

  MPI_Finalize();

  return 0;
}
Makefile
##############################################################################
# MPI Parallel Malloc program
# FILE: Makefile# DESCRIPTION:  See hello_mpi.c
###############################################################################
CC=mpicc
FLAGS=-g
FLAGS-OMP=-g -fopenmp

hello_mpi_exe:	hello_mpi.c
		$(CC) $(FLAGS) hello_mpi.c -o hello_mpi_exe

hello_mpi_omp_exe:	hello_mpi_omp.c
		$(CC) $(FLAGS-OMP) hello_mpi_omp.c -o hello_mpi_omp_exe

clean:
		rm -f  *.o *exe
Writing you CI YAML File
To use GitLab CI/CD, create a file named .gitlab-ci.yml at the root of the
project repository. Though the majority of the file will remain consistent
across facilities, we have attempted to highlight differences that most
observed depending one where your running.
Note
Take care while writing the YAML to avoid tabs and instead use spaces for indentation.
First, each job must be assigned a
stage. The naming of the
stages is arbitrary. In our example, we wish to have two stages
with the names build and test.
stages:
  - build
  - test
Next we are going to define several variables that will be required to use the Batch executor. Variables are an important concept in GitLab CI, each job is provided a prepared build environment that incorporates both project defined as well as system predefined variables.
In this example we are interacting with Slurm, requesting an allocation through
sbatch. The variable
SCHEDULER_PARAMETERS is the default variable the Batch executor will look
for when attempting to identify command line arguments to pass to the
underlying scheduler.
variables:
SCHEDULER_PARAMETERS:  "-N 1 -n 64 -p ecp-p9-4v100 -t 0:03:00"
Next we want to define several hidden keys that we can later refer to with GitLab extend keyword. By doing so it becomes possible to easily reuse elements of your YAML file. In this case we want to define a series of tags, used to specify the runner we wish our job to execute on. Additionally, we will define rules to prevent unnecessarily using our compute resources to test. With this rule defined the job’s that inherit from this key will only when if they are started either manually via the web interface or a pipeline schedule.
.shell-runner:
  tags: [shell, ecp-ci]

.batch-runner:
  tags: [slurm, ecp-ci]
  rules:
    - if: '$CI_PIPELINE_SOURCE == "web" || $CI_PIPELINE_SOURCE == "schedule"'
We can also define a pipeline wide before_script that will be observed by every job we create. In our case lets use it to load the necessary software modules.
In order to build the soft ware we will first need to load software modules available on the underlying system. In our example Slurm environment that is simply a gcc and openmpi module.
before_script:
  - ml gcc/8.3.0 openmpi/3.1.4
Now we can define a job for the build stage. The goal is make both the MPI
as well as MPI + OMP binaries. We are going to extend the hidden keys we
just defined and also introduce the concept of
artifacts. Using
artifacts GitLab will upload the defined paths to the server and all jobs
in subsequent stages will then download these. If we did not use some
mechanism to capture the binaries they would be deleted whenever the next job
started. It is also important to note that the script defined at the job
level will always be executed with Bash
when using facility runners.
mpi-build:
  stage: build
  extends:
    - .shell-runner
  script:
    # Obverse the directory structure.
    - ls -la
    - make hello_mpi_exe
    - make hello_mpi_omp_exe
  artifacts:
    paths:
      - ./hello_mpi_exe
      - ./hello_mpi_omp_exe
Finally we can create the job for our test stage. In this case we will be using the runner that is configured as a Batch executor and as such the script will be submitted to the underlying scheduling system using our earlier defined parameters. Keep in mind that depending on where you are running you will need to account for differences in executing your tests on the compute resources.
We are also choosing to specify variables at the job level. Earlier in the file we specified them at a pipeline level, there is a priority of environment variables that will be observed.
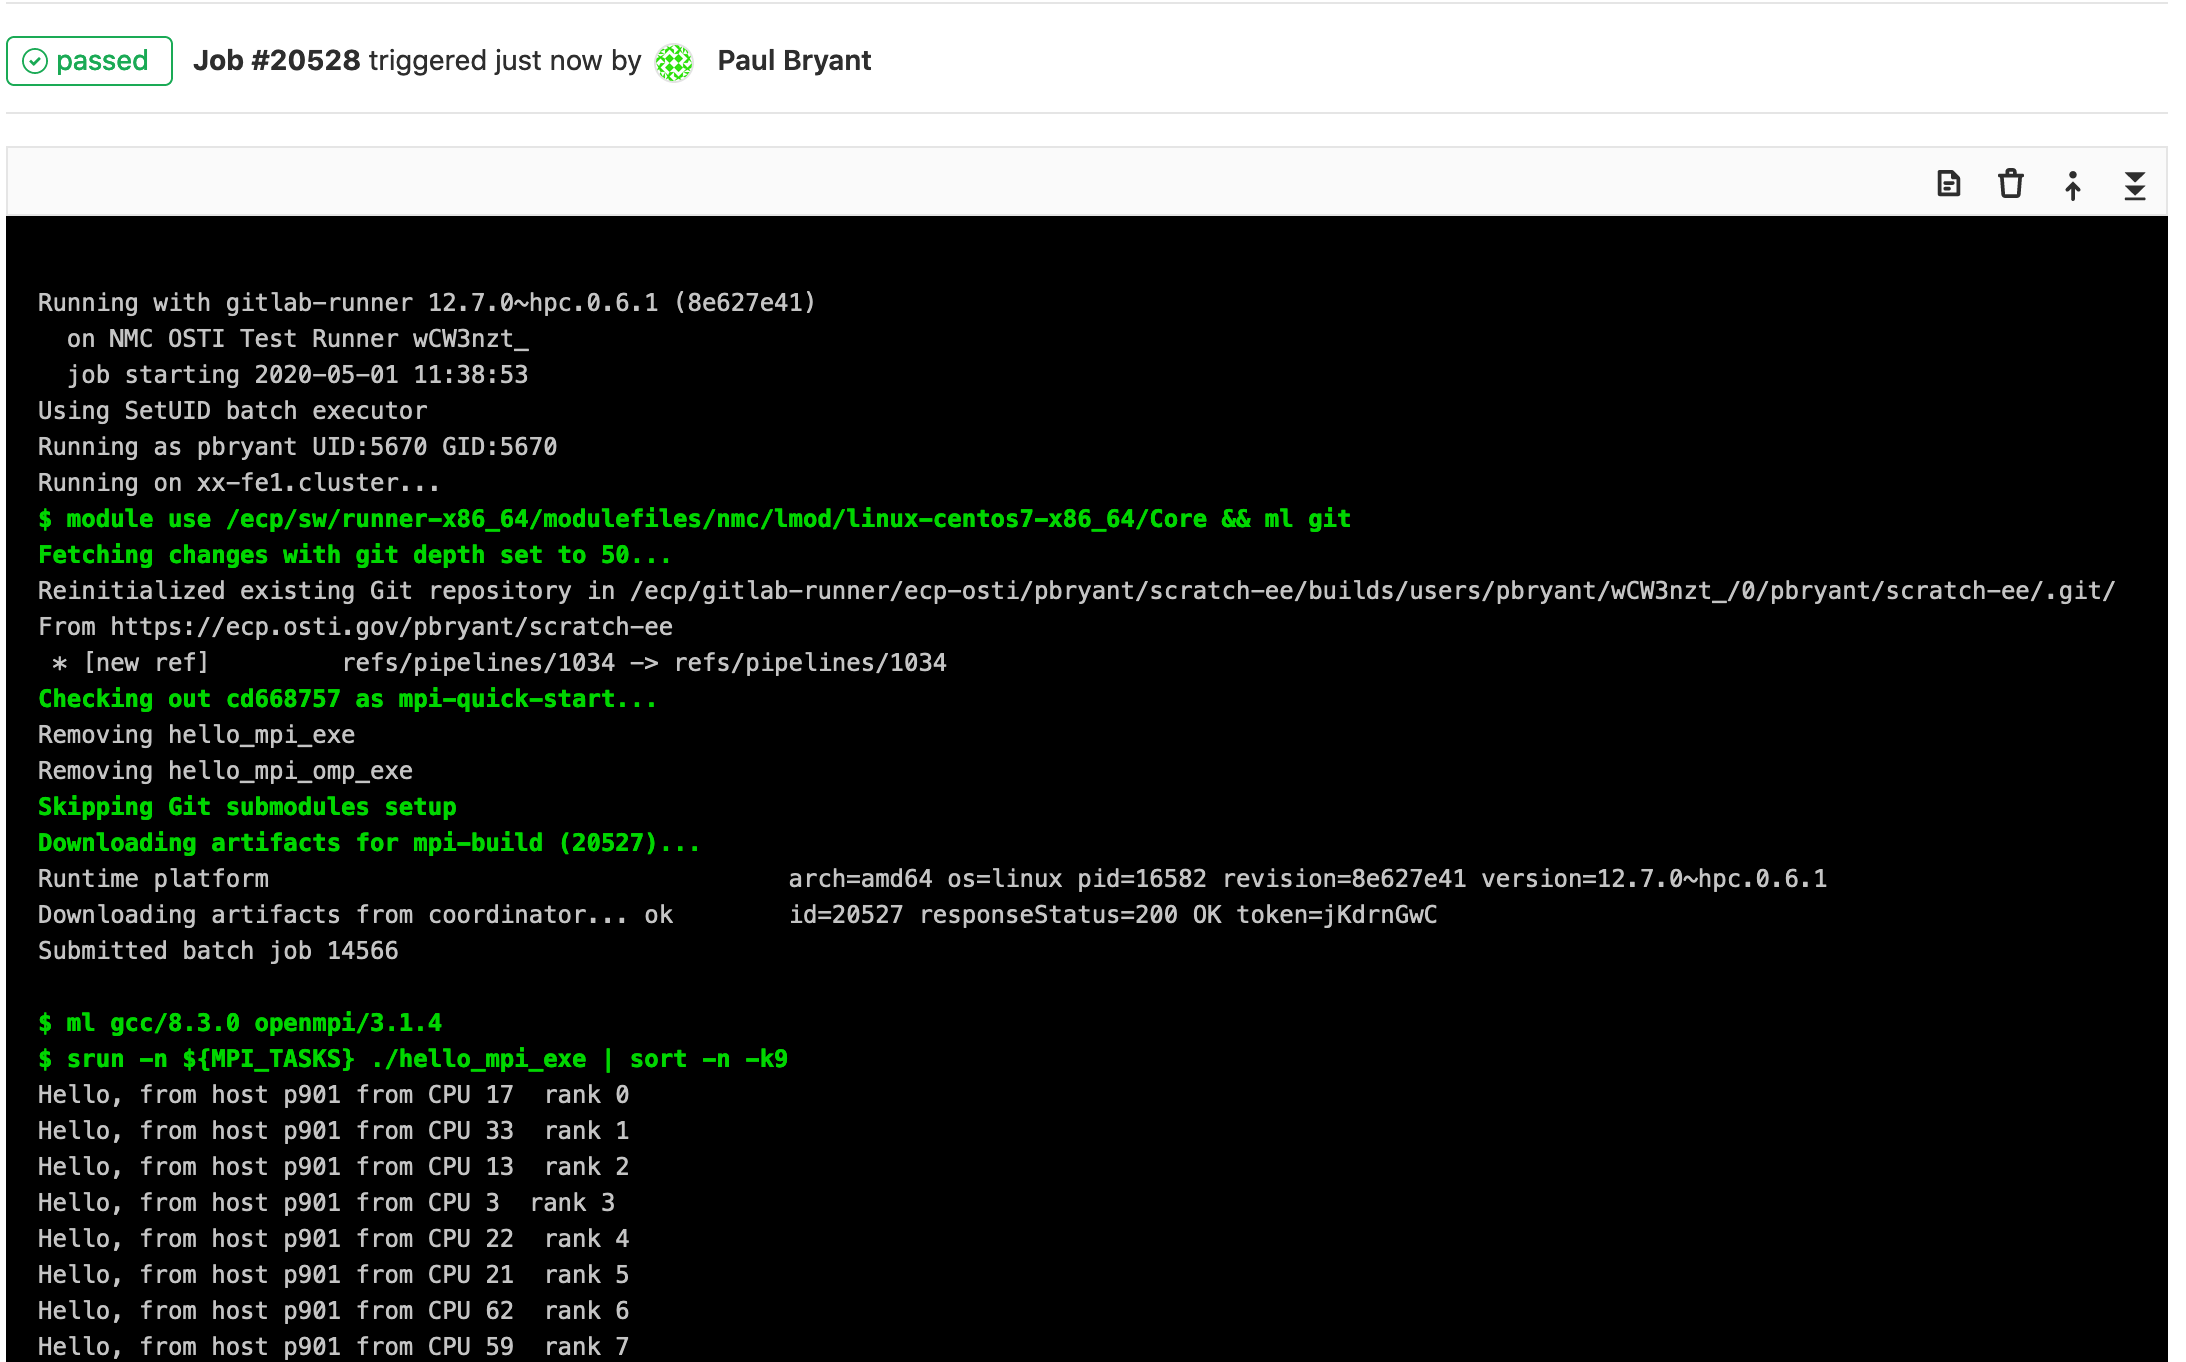
mpi-test:
  stage: test
  extends:
    - .batch-runner
  variables:
    MPI_TASKS: 64
    OMP_NUM_THREADS: 2
  script:
    - srun -n ${MPI_TASKS} ./hello_mpi_exe | sort -n -k9
    - mpirun -n ${MPI_TASKS} ./hello_mpi_omp_exe | sort -n -k9
Now that you have defined your .gitlab-ci.yml file it is time to run it.
Since we’ve defined rules for test stage we know that it will not run
without some manual intervention. In this case simply go to
CI/CD -> Pipelines and select Run Pipeline.

Viewing the Results
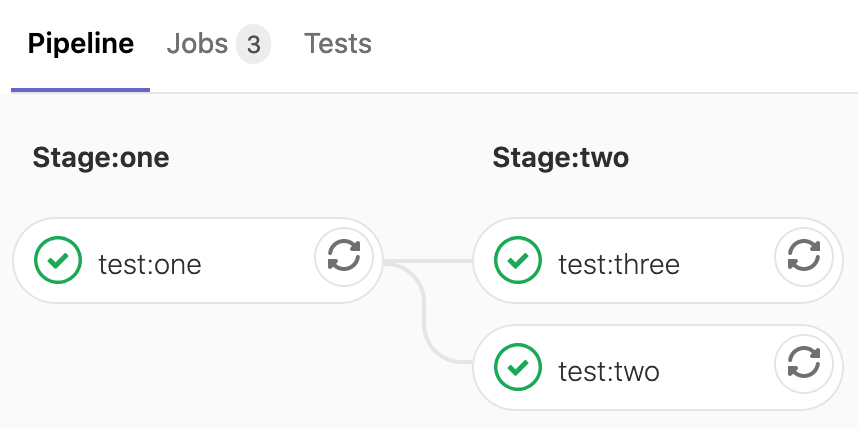
Now by returning to the CI/CD -> Pipelines screen you will be able to view your completed (or running) pipeline.

Selecting a job from that pipeline will provide you with a detailed look, including all stdout/stderr generated. This screen will be updated constantly throughout the job but beware there will be a noticeable delay.
Completed YAML
stages:
  - build
  - test

variables:
  SCHEDULER_PARAMETERS:  "-N 1 -n 64 -p ecp-p9-4v100 -t 0:03:00"

.shell-runner:
  tags: [shell, ecp-ci]

.batch-runner:
  tags: [slurm, ecp-ci]
  rules:
  - if: '$CI_PIPELINE_SOURCE == "web" || $CI_PIPELINE_SOURCE == "schedule"'
    when: always

before_script:
  - ml gcc/8.3.0 openmpi/3.1.4

mpi-build:
  stage: build
  extends:
    - .shell-runner
  script:
    # Obverse the directory structure.
    - ls -la
    - make hello_mpi_exe
    - make hello_mpi_omp_exe
  artifacts:
    paths:
      - ./hello_mpi_exe
      - ./hello_mpi_omp_exe

mpi-test:
  stage: test
  extends:
    - .batch-runner
  variables:
    MPI_TASKS: 64
    OMP_NUM_THREADS: 2
  script:
    - srun -n ${MPI_TASKS} ./hello_mpi_exe | sort -n -k9
    - mpirun -n ${MPI_TASKS} ./hello_mpi_omp_exe | sort -n -k9