ECP Annual 2020 CI Startup Tutorial
Important
This tutorial was designed specifically for the resources available at the ECP Annual 2020 meeting. We high recommend following the newer ECP CI Startup Tutorial and simply using this for reference if required.
If you’re joining us at the 2020 ECPAM, thank you for attending the CI Startup Tutorial. The entire hands-on portion of the tutorial is documented below. The only tool you will need to run the hands-on portion of this tutorial yourself is a GitLab compatible web browser. Additionally, we have the luxury of using the OSTI GitLab instance for several temporary training accounts for the sole purpose of this tutorial. These accounts have been configured and supplied with the necessary test resources to complete every example. At this time the documentation may not support stand alone completion of the entire tutorial. However you can still find all code referenced on our ECP-CI GitLab repositories.
Navigating GitLab CI
All CI/CD functionality we demonstrate in this tutorial is controlled via
a special YAML
file in the root directory of the repository named .gitlab-ci.yml.
Before we write a .gitlab-ci.yml file and trigger our
first pipeline, we introduce some basic concepts of GitLab CI/CD.
If you are interested in more details of GitLab CI/CD please see the
official documentation.
First please use the credentials provided to log into the training account
at https://ecp-training.osti.gov:
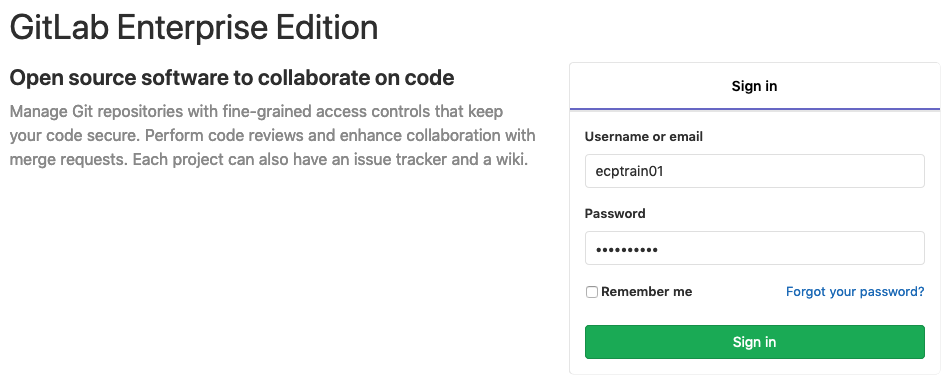
If you see an orange banner message warning that You won’t be able to pull or push project code via SSH until you add an SSH key to your profile, just ignore that message.
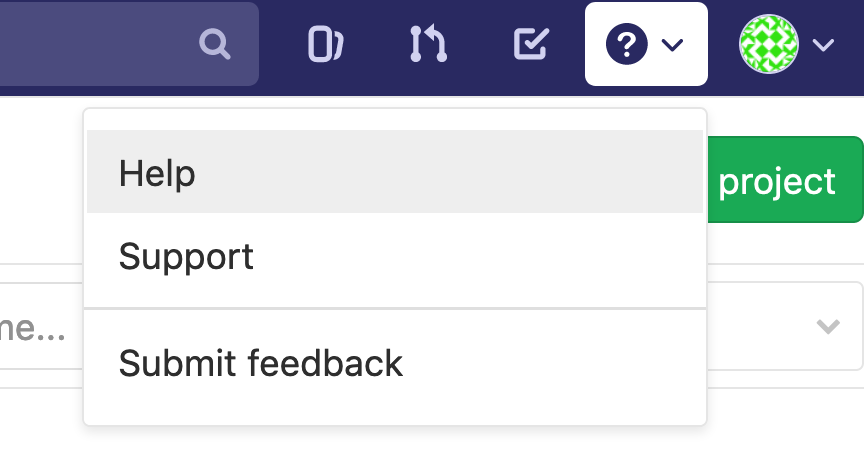
After successfully logging in you will see a list of projects owned by your
account. Before we begin, lets
determine the version of GitLab by selecting the ? icon from the top
right
corner and then help. The GitLab version will be displayed at the top of
this page along with links to a lot of other useful documentation.
Now, return to the Projects page and select the
Hello Environment project.
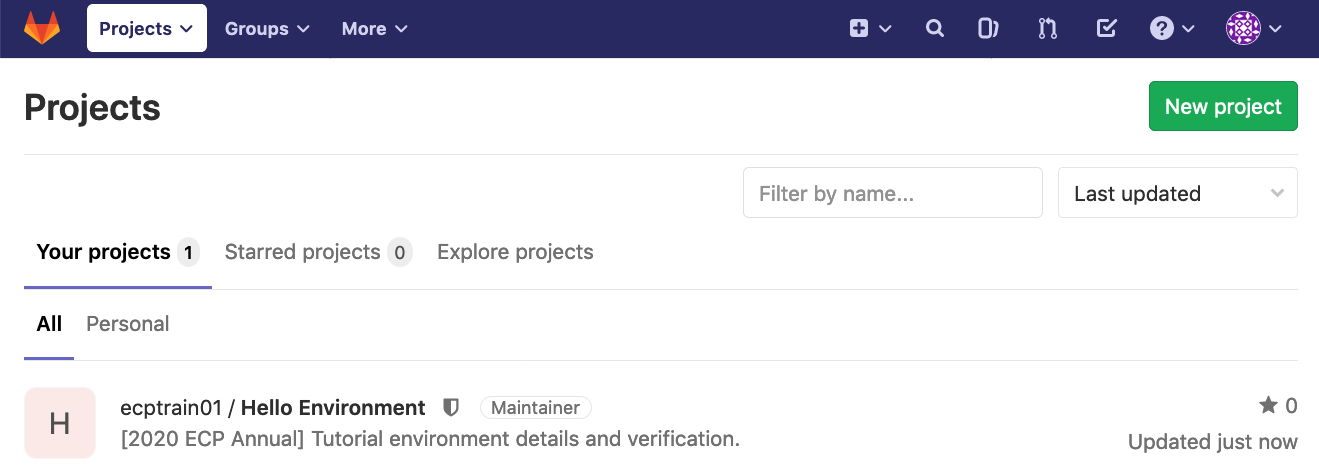
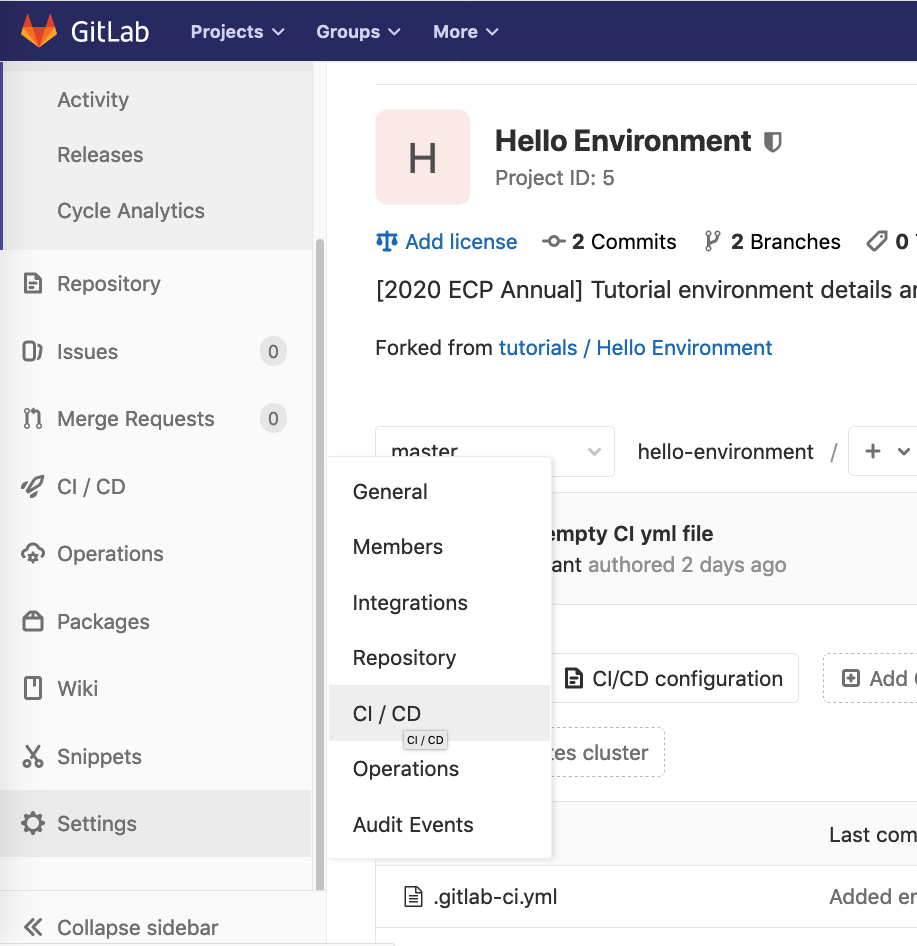
On the project details page you should see an overview of the project,
and its files. In this lesson we are focusing only on CI/CD aspects of
GitLab. To manage the related settings go to Settings –> CI/CD.
Depending on your screen size, you may need to collapse the sidebar.
Once in the CI/CD Settings page you will notice a number of configuration
options. We encourage you to explore these
if time permits, but there are a couple that are important to highlight
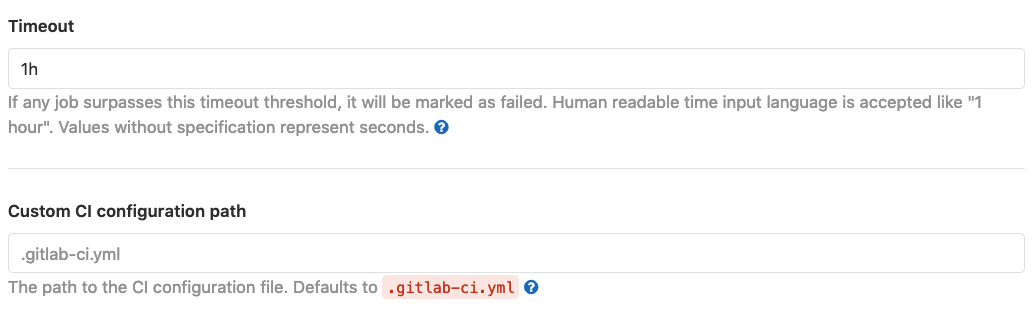
for this lesson. In the General Pipelines section, some key parameters are:
Timeout: This is the default timeout (one hour) for each CI job. A GitLab CI job, however, is something quite different from the jobs run by a scheduler on behalf of a batch executor. It is important not to confuse these two wholly different timeout parameters.
Custom CI Configuration Path: This is the default path within the repository at which to find the YAML file controlling CI/CD behavior. The default is
.gitlab-ci.yml, and is references at the root of the repository. This setting is useful for managing CI across multiple mirrors.
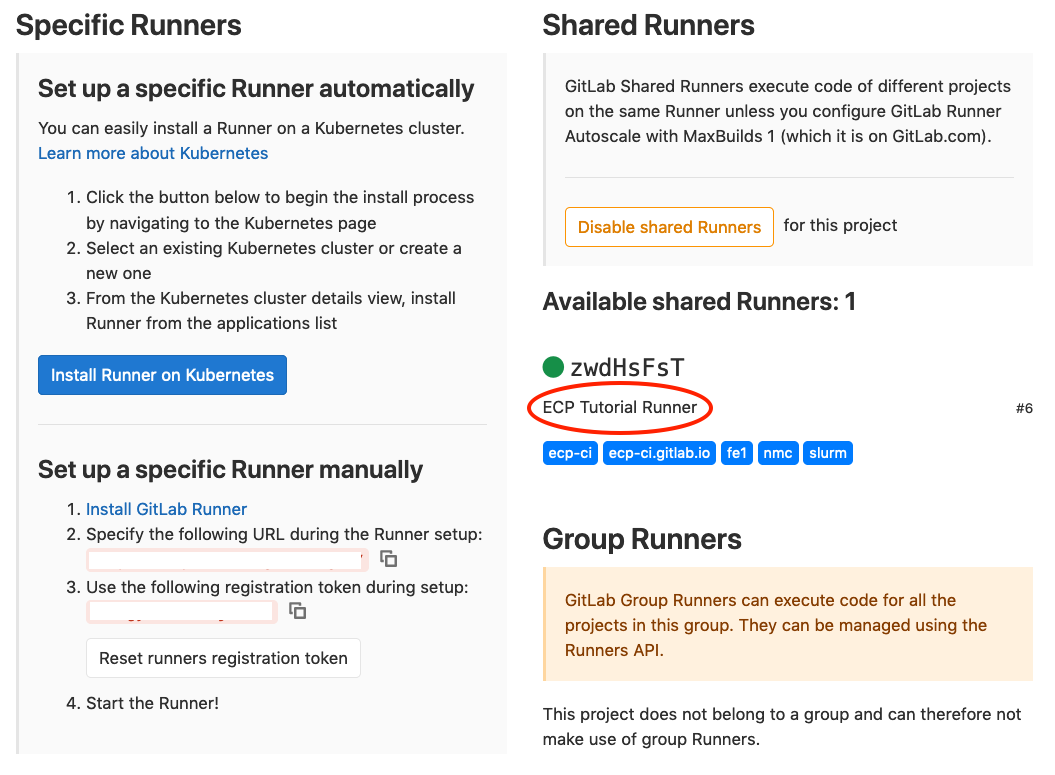
If we Collapse the General section and Expand the Runners section,
we can view available runners (and register new ones).
For this tutorial, we have a single runner available,
“ECP Tutorial Runner”. This page shows the runner’s current status (hopefully
a green dot indicating it is healthy). There is also a list of
tags
associated with the runner. Tags are defined by whoever administers the
runner and are used in .gitlab-ci.yml files to target CI/CD jobs to
specific runners. Knowing how to find these tags is important.
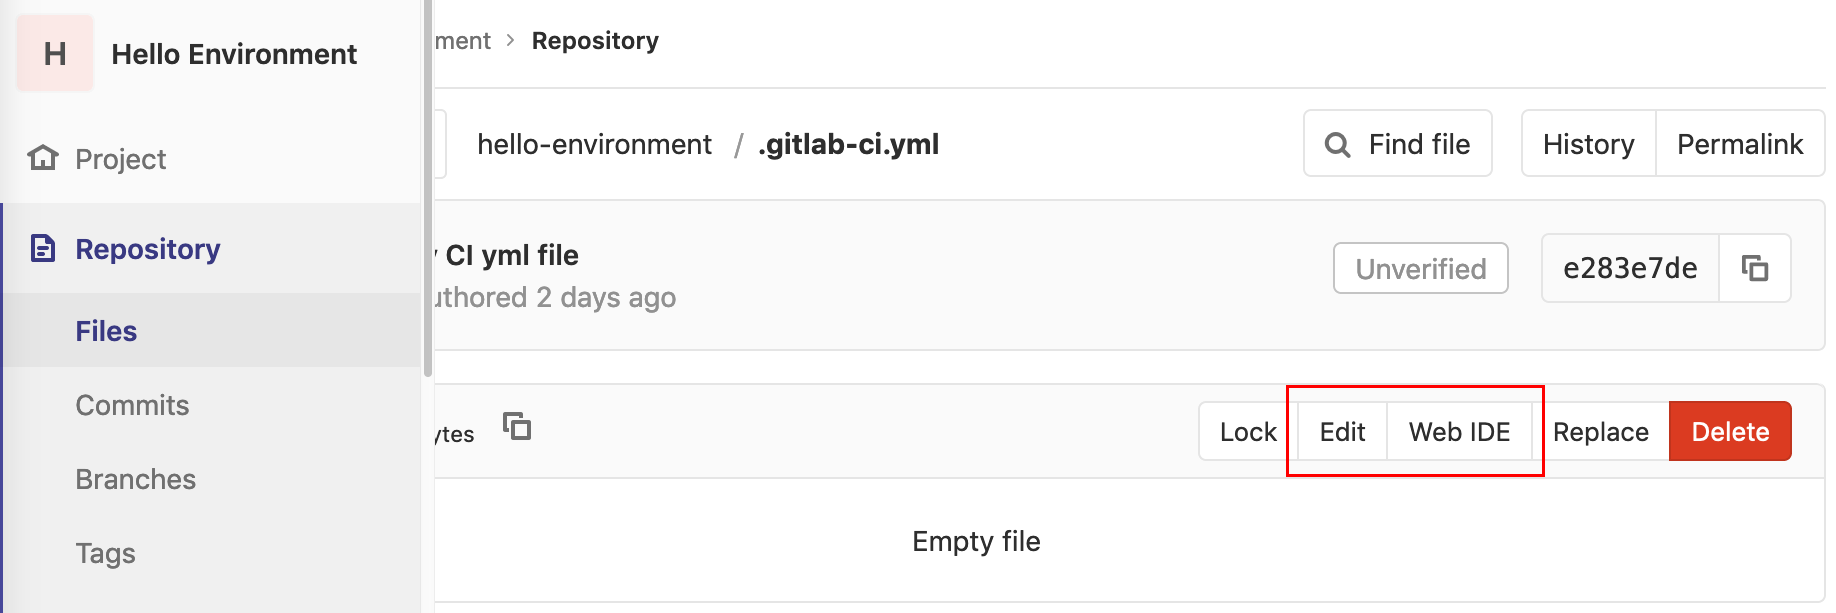
Lastly, to simplify this tutorial, we ask that all editing be
done via your browser’s interface to GitLab. We recommend using either the
edit file functionality or the builtin
WebIDE. From either
you can make changes and commit them directly to the repository.
Hello Environment
In the first example, we create a very simple single stage CI pipeline and
introduce the test resources to tutorial users. At any point during the
hands-on if you wish to see the target completed file please see the
Completed - Hello Environment. Navigate to your Hello Environment
repository at this time if you are not already there.
Before we begin writing the .gitlab-ci.yml file, let’s first take a look at
the way the resources are structured for this tutorial:
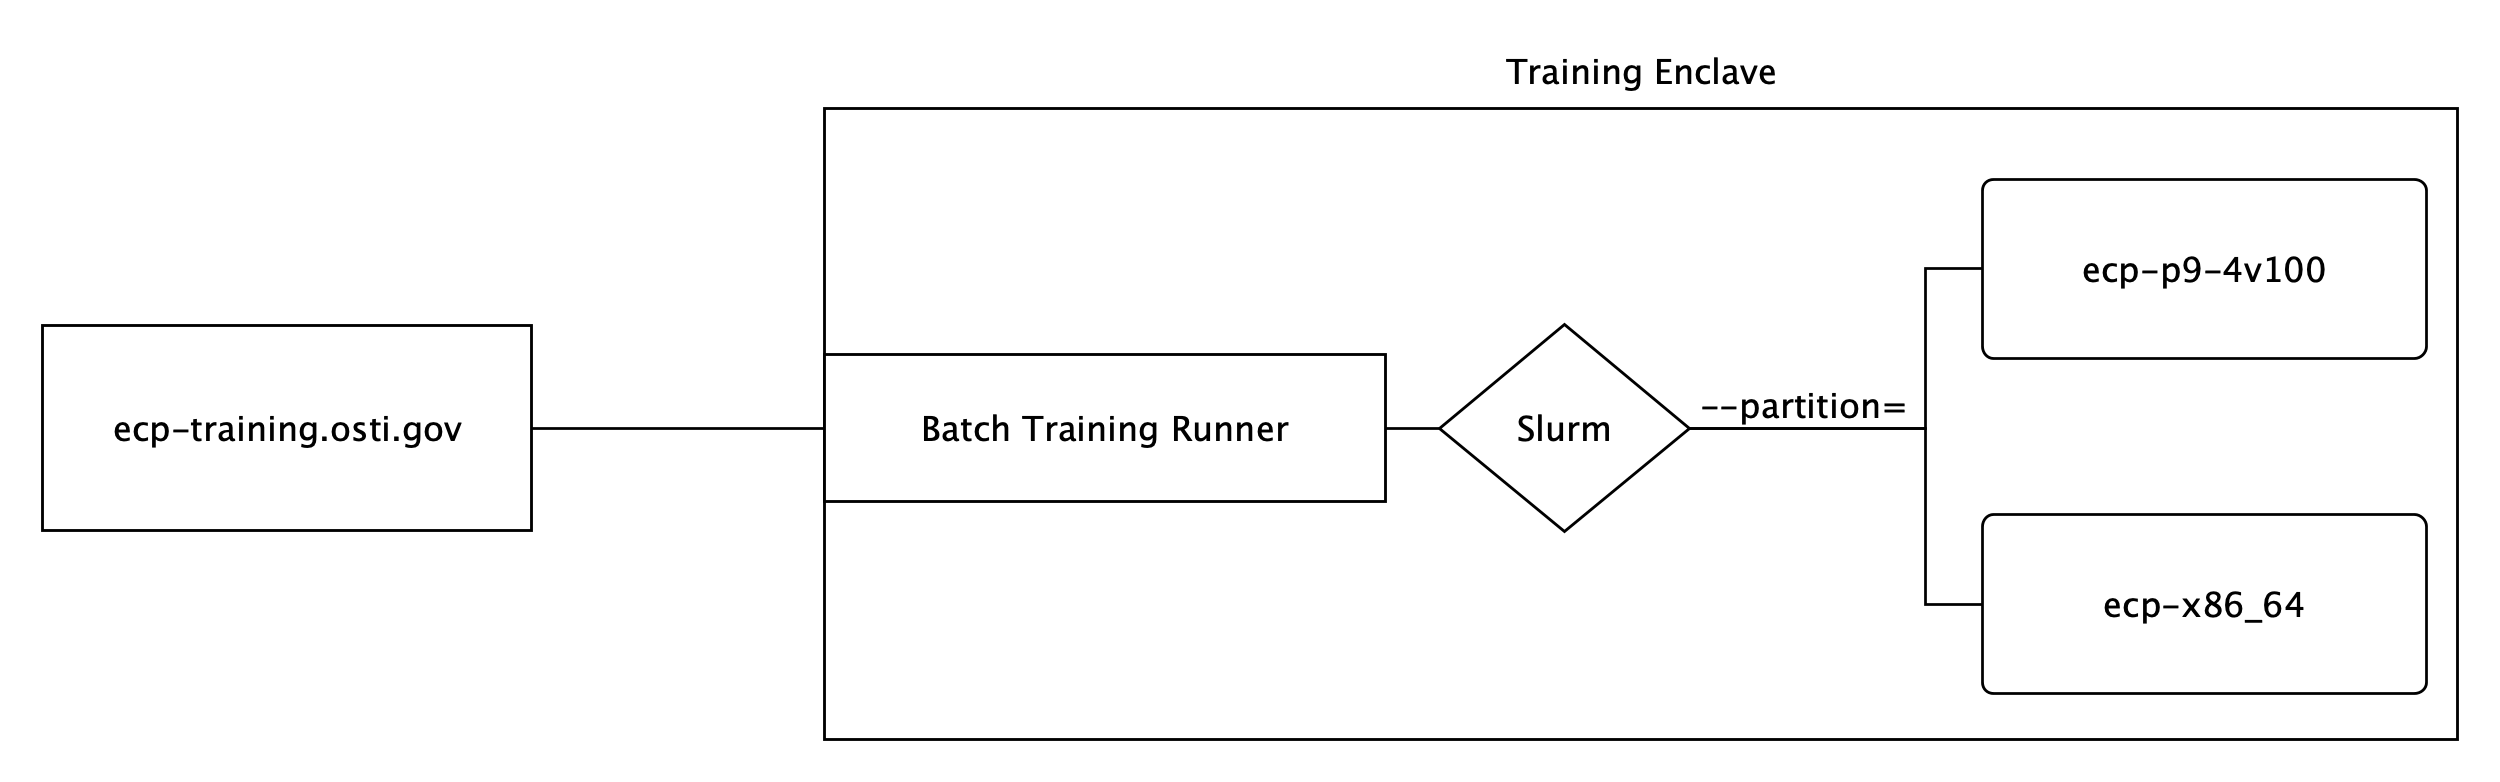
From the diagram, the runner is configured to use a batch executor which in
turn uses Slurm as the underlying scheduler. There are two partitions
available, ecp-p9-4v100 (Power 9 with GPU) and ecp-x86_64
(Intel Xeon).
The project consists of just two files, .gitlab-ci.yml which is currently
empty, and environment.bash which is a very simple script to output
basic system information on stdout. Our goal is to trigger two CI/CD jobs
that wind up running environment.bash on both of the available test
resources and examine their outputs to confirm correct behavior. For the rest
of this example, we will be making changes to the .gitlab-ci.yml file only.
Note
Remember that YAML uses 2 spaces, depending on your IDE you may need to account for this manually.
First, each job must be assigned a
stage. The naming of the
stages is arbitrary. In our example, we wish to have just a single stage
with the name examine.
stages:
  - examine
To trigger CI/CD on both test resources, we need to define two jobs. Like
stages, these jobs can have arbitrary names. We will name our jobs
p9-partition and x86_64-partition.
Let’s start with job p9-partition and associate it with our
examine stage.
p9-partition:
  stage: examine
If you refer back to the Navigating GitLab CI you will recall that runners
are identified (or targeted) via tags.
In our case we will want to ensure that our job is running on the
“Batch Training Runner”. Since for this tutorial, there is only one available
runner with tags, ecp-ci, fe1, nmc, nmc-fe1-batch-01 and
slurm, any single matching tag will be sufficient to uniquely identify
it in our case. When multiple runners are available the server will attempt
to match the first available runner to a job with a subset of tags.
For the sake of demonstration, we will use two tags to identify
the desired runner. Add these tags to your already existing p9-partition
job.
p9-partition:
  stage: examine
  tags: [slurm, ecp-ci]
Given the values specified by the tags keyword, the job will run using
the (one and only) matching runner. In this runner, Slurm is used used as
the underlying job scheduler. It is important
to note that with Slurm all jobs are submitted using
sbatch. So, we must use
appropriate parameters for requesting an allocation.
Variables
are an important concept of GitLab CI as each job will be
provided with a build environment that incorporates a number of
predefined variables
along with those developers may define. In our case we will
want to satisfy an expectation of the batch executor by defining a value for
the SCHEDULER_PARAMETERS variable.
p9-partition:
  stage: examine
  tags: [slurm, ecp-ci]
  variables:
    SCHEDULER_PARAMETERS: "--nodes=1 --partition=ecp-p9-4v100 --time=00:05:00"
Although the batch executor may expect a value to be defined for
SCHEDULER_PARAMETERS, it is not truly required. However, failing to
define this variable can lead to unexpected results. Thus it is
strongly encouraged to always provide one. Additionally, runner
administrators may define new expectations for this variable
name (e.g. SLURM_PARAMETERS).

Now that we have defined a job, stage, targeted a runner, and specified parameters for submission to the underlying scheduler, we need to define what the job is going to do. That will be the script section.
Fundamentally the runner is executing a shell script, specifically in our
case a Bash script. In addition,
the job will always begin in a runner
designated folder (CI_PROJECT_DIR) at the root of your repository. In our
case we are going to add this script to our existing
p9-partition job.
p9-partition:
stage: examine
tags: [slurm, ecp-ci]
variables:
    SCHEDULER_PARAMETERS: "--nodes=1 --partition=ecp-p9-4v100 --time=00:05:00"
script:
    - echo "Script"
    - bash ./environment.bash
Now that the p9-partition job has been defined we will want to establish
a job for the other partition that will look almost completely identical.
x86_64-partition:
  stage: examine
  tags: [slurm, ecp-ci]
  variables:
    SCHEDULER_PARAMETERS: "--nodes=1 --partition=ecp-x86_64 --time=00:05:00"
  script:
    - echo "Script"
    - bash ./environment.bash
As you may have noticed the only difference can be seen in the job’s
SCHEDULER_PARAMETERS variable. Again, since we are using Slurm, we will
refer to sbatch and define --partition=ecp-x86_64. This will
ensure that both jobs are executed using both of the available compute
resources.
Now lets add a before_script that will reside outside of the scope
other either of two jobs we’ve already created. As the name implies this
will run before anything found in our script section.
before_script:
  - echo "Before Script"
  - pwd
  - ls -la
Finally, we can create an additional script that will run upon
completion of the earlier defined build script called the after_script.
There are several important
facts that are worth understanding.
The
after_scriptwill be executed in a new shell different from the shell the job executes in, meaning a clean Bash environment from the earlier script.This stage will run regardless of if your earlier script failed due to a build error.
With the batch executor you will find that the
after_scriptwill only execute after the completion of the scheduled job. This means that the script will run outside of any compute resources/available allocation.
after_script:
  - echo "After Script"
  - id
  - hostname
Defining the after_script outside the scope of either of the previously
defined jobs, just like our before_script, means it is global
(to the pipeline) and will be executed for all jobs defined.
Once you complete the above edits to the .gitlab-ci.yml file
feel free to save/commit the changes. Navigate to the CI/CD –> Pipelines.
From here you will see the pipeline that was triggered when the changes to
the .gitlab-ci.yml file were committed.
If for any reason your pipeline is not running successfully, please review the following:
Troubleshooting your YAML if you’ve been presented with a YAML error.
Confirm the contents against the Completed - Hello Environment
Troubleshooting your YAML
It is not uncommon to see the following error message when examining the Pipelines page:

Hovering your mouse over the yaml invalid tag can provide additional
context regarding the error. However, the more helpful solution involves
leveraging GitLab’s builtin CI Lint tool. The CI Lint button can be found
on the CI/CD –> Pipelines page. Once selected you must copy/past in
the contents of your .gitlab-ci.yml file.
In our above example you may notice the error encountered is a missing
stages parameter.
Completed - Hello Environment
stages:
  - examine

p9-partition:
  stage: examine
  tags: [slurm, ecp-ci]
  variables:
    SCHEDULER_PARAMETERS: "--nodes=1 --partition=ecp-p9-4v100 --time=00:05:00"
  script:
    - echo "Script"
    - bash ./environment.bash

x86_64-partition:
  stage: examine
  tags: [slurm, ecp-ci]
  variables:
    SCHEDULER_PARAMETERS: "--nodes=1 --partition=ecp-x86_64 --time=00:05:00"
  script:
    - echo "Script"
    - bash ./environment.bash

before_script:
  - echo "Before Script"
  - pwd
  - ls -la

after_script:
  - echo "After Script"
  - id
  - hostname
Heat Equation
Before we begin the this next tutorial, I would like to highlight that for the upcoming sections will be using the Package for Extreme-Scale Science - Hand Coded Heat Application. I highly recommend that if you are interested you can explore the full lesson at the link provided. We will only be looking at this from the standpoint of the using the code as part of a CI pipeline.
Similar to the Hello Environment exercise we will begin by editing the
empty .gitlab-ci.yml file to declare our planned
stages:
stages:
  - build
  - test
In this tutorial we will again target both available partitions; however, it will be across two stages. First we will build our software followed by a very simple test. Also, if we look back at our earlier tutorial you might have noticed there is a fair amount of duplicate code. GitLab offers a feature extends that we can use to help with this.
Let’s define a hidden key .tutorial-runner that we will be able to
reference subsequently in the our yaml and inherit from it:
.tutorial-runner:
  tags: [nmc-fe1-batch-01]
Previously we defined several tags that will be used to specify the runner we wish to target. The difference now, from our previous example, is that we are targeting a “unique” runner tag (ECP CI runner swill aim to have a unique tag available).
Now let’s define two additional hidden keys, one for each of the partitions we will want to utilize:
.x86_64-platform:
  extends: .tutorial-runner
  variables:
    SCHEDULER_PARAMETERS: "-n 8 -p ecp-x86_64 -t 00:05:00"

.ppc64le-platform:
  extends: .tutorial-runner
  variables:
    SCHEDULER_PARAMETERS: "-n 20 -p ecp-p9-4v100 -t 00:05:00"
Please note, that is you are a Slurm user you may question why we’ve chosen to request an allocation in this manner. It is simply to work with the number of potential tutorial users and the Slurm configuration of shared compute resources. Your jobs will not be running across all requested ranks.
You can see that for each, we’ve chosen to extend the previously defined
.tutorial-runners. GitLab has documented support for multi-level
inheritance; however, they recommend no more than three levels.
With this the tags we defined earlier
are inherited by our two new hidden keys. Now for our build stage we are going
to define one more hidden key, .build-script:
.build-script:
  stage: build
  script:
    - module load gcc
    - make
    - ./heat --help
  artifacts:
    name: "$CI_JOB_NAME-$CI_COMMIT_REF_NAME"
    paths:
      - heat
Our usage of stage and script have been covered previously; however,
artifacts
may be new. The artifacts keyword is used to specify a list of files
and/or directories that should be captured after a job has been completed.
These are then uploaded to the GitLab server, where they can be downloaded
manually and will be made available to jobs in subsequent stages of the
pipeline. In this example we are capturing a binary (heat) that we have
just compiled.
For our build stage let’s create two jobs, one for each partition. Each of which will inherit from our previously defined keys as a reverse deep merge based on the keys will be performed. Although in our example we focus on a very limited number of jobs, properly using GitLab’s provided functionally can be a major boon to your development efforts when working with larger more complicated pipelines.
build:x86_64:
  extends:
    - .x86_64-platform
    - .build-script

build:ppc64le:
  extends:
    - .ppc64le-platform
    - .build-script
Now to create a .test-script that we will use for defining the jobs
we want to run in the test stage. This will look very similar to our efforts
with the .build-script. The test for our binary are very simple and involve
a quick sanity check and using cat(1)
to print the contents of the generated results. There is no actual verification; however,
if the sanity check returned a non-zero exit it would cause the job to fail.
.test-script:
  stage: test
  script:
    # sanity check
    - ./heat
    - cat heat_results/heat_results_soln_final.curve
    # confirm linear steady state
    - ./heat dx=0.25 maxt=100 ic="rand(125489,100,50)" runame=test
    - cat test/test_soln_00000.curve
    - cat test/test_soln_final.curve
Now that we have a script, lets define our two jobs for the test
stage as so:
test:x86_64:
  extends:
    - .x86_64-platform
    - .test-script
  needs: ["build:x86_64"]

test:ppc64le:
  extends:
    - .ppc64le-platform
    - .test-script
  needs: ["build:ppc64le"]
You probably have already noticed the addition of needs. This is rather new to GitLab, just introduced in server version 12.3. The keyword enables executing jobs out-of-order, allowing you to implement a directed acyclic graph by referencing a list of jobs that also exist in your pipeline.
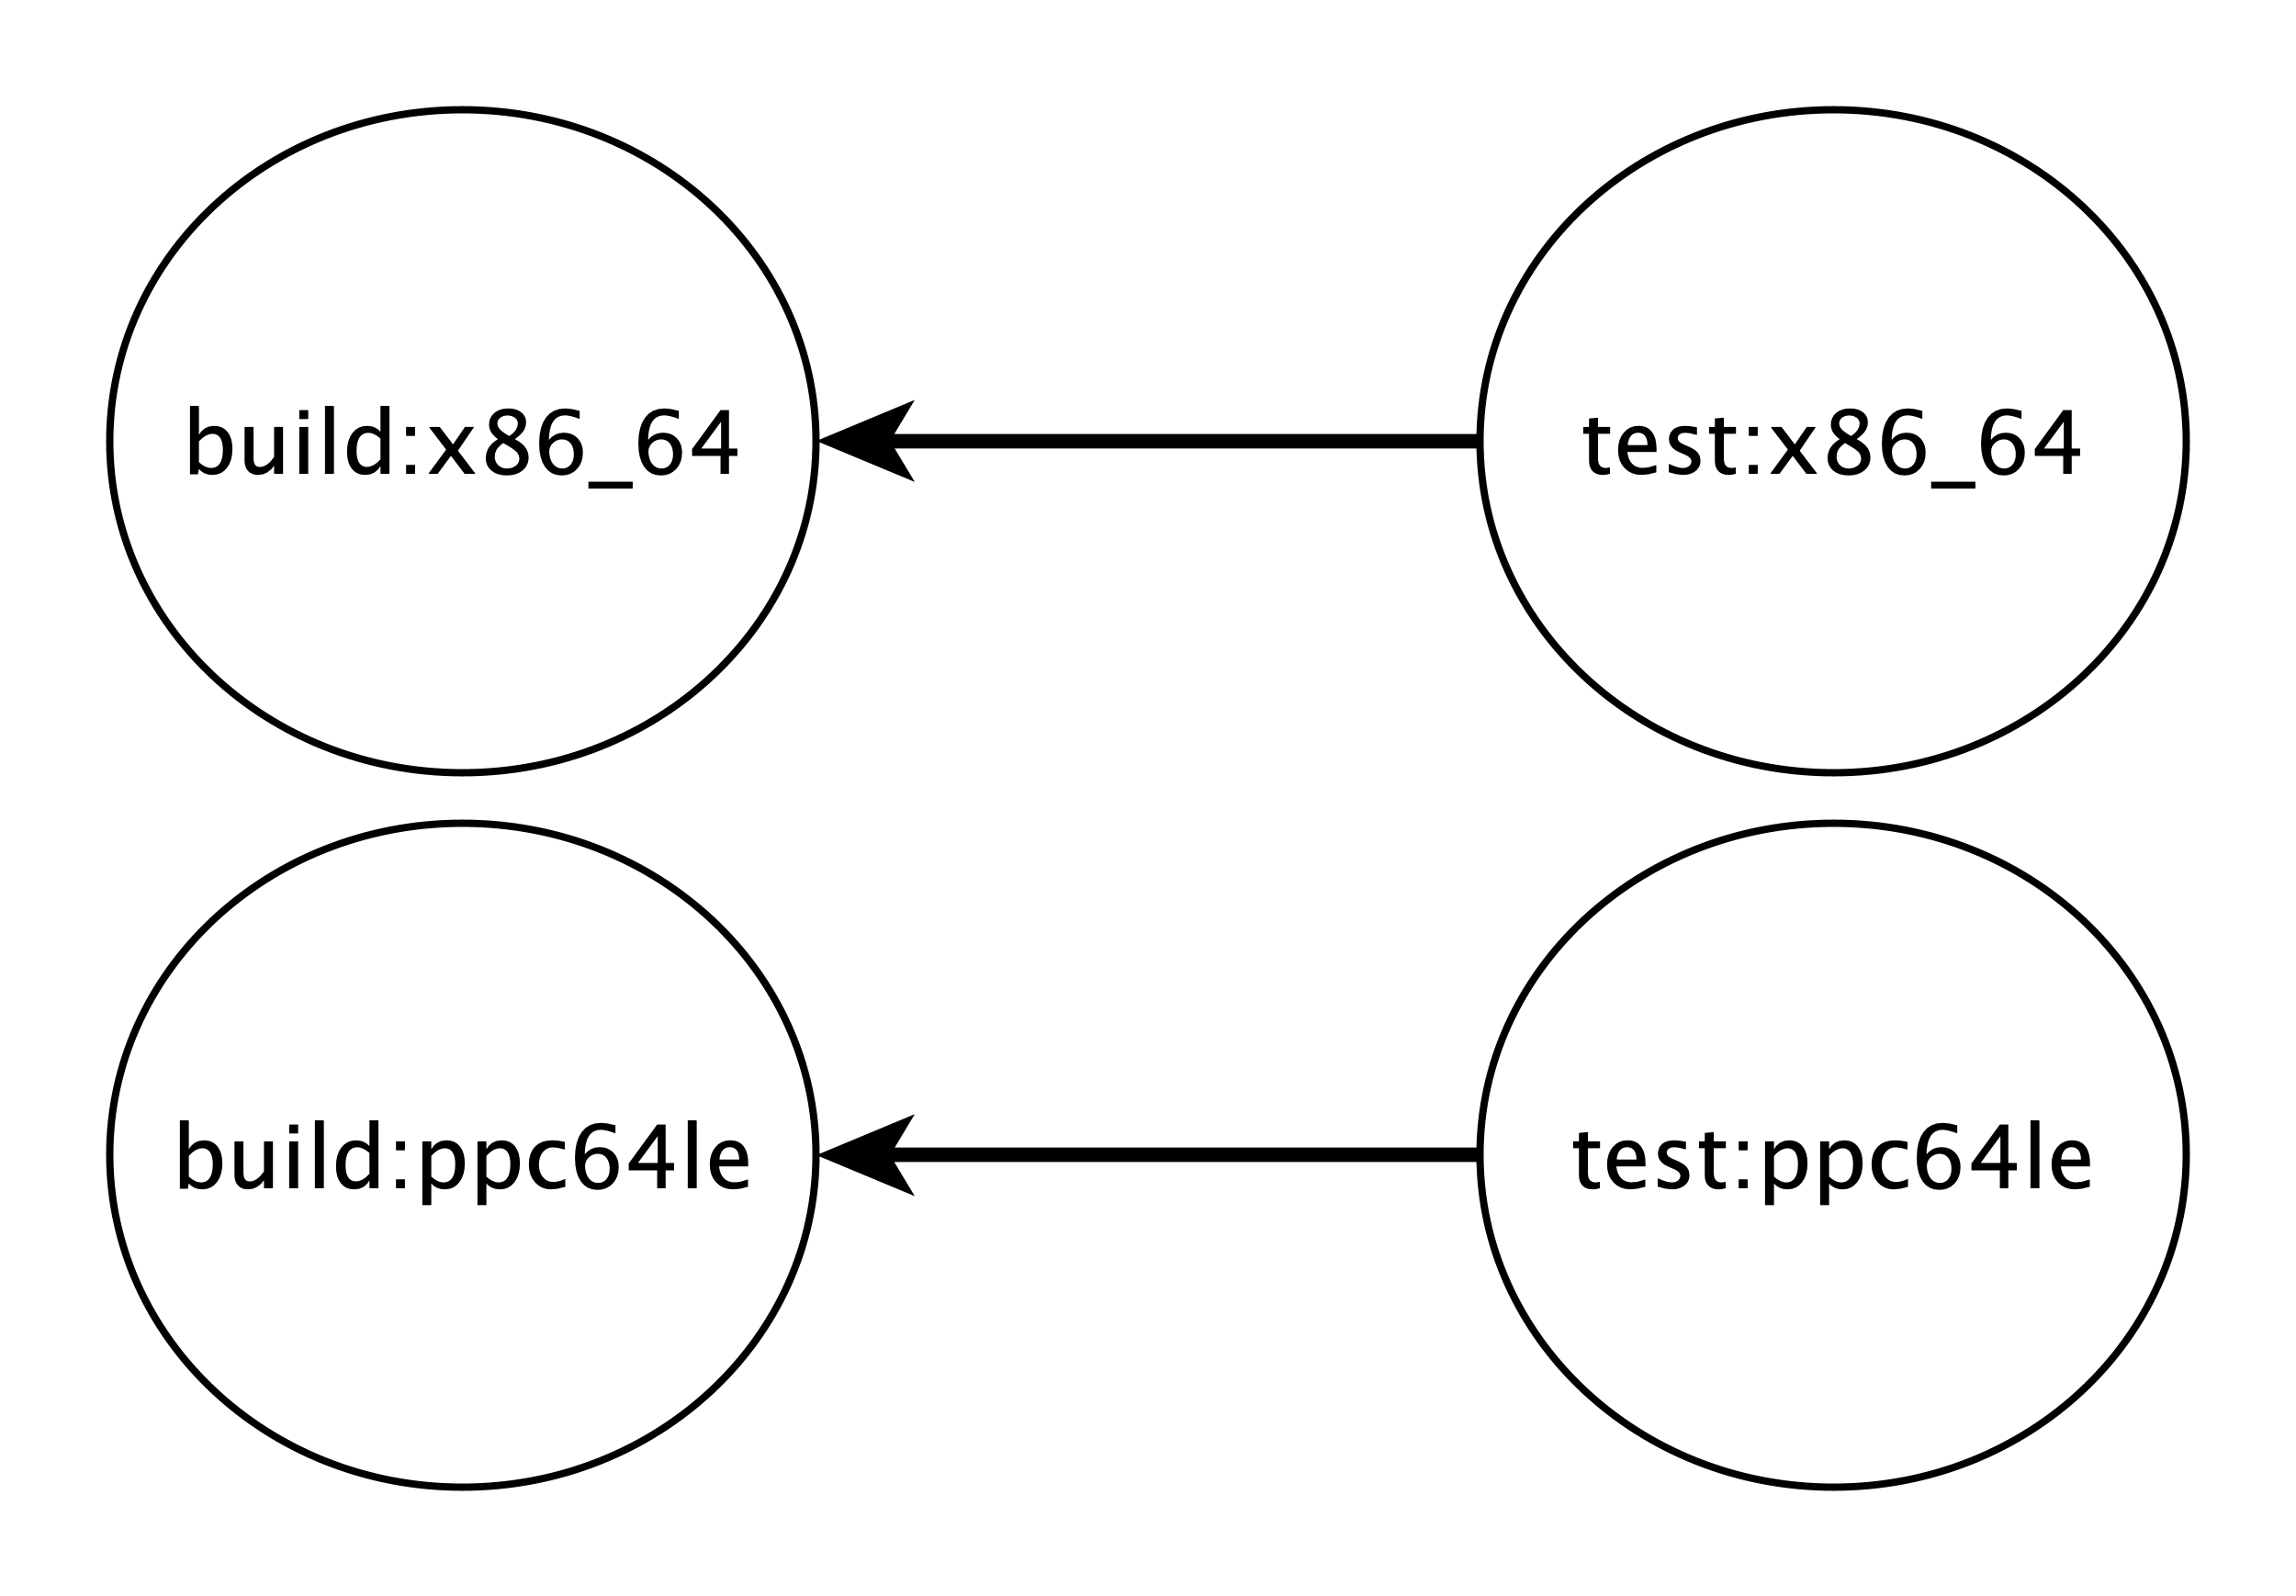
The execution order is just one benefit to using needs another
is artifact management. When we use artifacts the files will
be made available for all jobs in subsequent stages. So by default jobs
will attempt to download available artifacts. By defining a needs, we will
signify that the job will only be required to download artifacts from
the list of jobs. In our example this is either build:x86_64 or
build:ppc64le.
As we’ve down in our previous example, once you’ve complete the above edits
to the .gitlab-ci.yml file save/commit the changes. Navigate to see the
pipeline that was triggered and inspect your running jobs.
Completed - Heat Equation
stages:
  - build
  - test

.tutorial-runner:
  tags: [nmc-fe1-batch-01]

.x86_64-platform:
  extends: .tutorial-runner
  variables:
    SCHEDULER_PARAMETERS: "-n 8 -p ecp-x86_64 -t 00:05:00"

.ppc64le-platform:
  extends: .tutorial-runner
  variables:
    SCHEDULER_PARAMETERS: "-n 20 -p ecp-p9-4v100 -t 00:05:00"

.build-script:
  stage: build
  script:
    - module load gcc
    - make
    - ./heat --help
  artifacts:
    name: "$CI_JOB_NAME-$CI_COMMIT_REF_NAME"
    paths:
      - heat

build:x86_64:
  extends:
    - .x86_64-platform
    - .build-script

build:ppc64le:
  extends:
    - .ppc64le-platform
    - .build-script

.test-script:
  stage: test
  script:
    # sanity check
    - ./heat
    - cat heat_results/heat_results_soln_final.curve
    # confirm linear steady state
    - ./heat dx=0.25 maxt=100 ic="rand(125489,100,50)" runame=test
    - cat test/test_soln_00000.curve
    - cat test/test_soln_final.curve

test:x86_64:
  extends:
    - .x86_64-platform
    - .test-script
  needs: ["build:x86_64"]

test:ppc64le:
  extends:
    - .ppc64le-platform
    - .test-script
  needs: ["build:ppc64le"]
Expanded Heat Equation
This final documented hands-on section focuses on expanding our
earlier efforts in the Heat Equation. If your job is not running please
refer to either the Completed - Heat Equation or the answer branch
found in your repository to ensure that the .gitlab-ci.yml file
is aligned.
The purpose of this section is to expand the functionality of the
.gitlab-ci.yml found in our Heat Equation. With a goal of
plotting the results of a simulation. To do this we will need to
make sure that dependencies such as gnulot
and bc
are available. In the case of the ecp-p9-4v100 partition both
requirements are available as modules; however, we are missing
some from the ecp-x86_64 partition and will need build those
requirements.
We will want to include two new stages that
will attempt to address missing dependencies in our environment as well
as plot a specific scientific problem. So to begin with let’s add these
to our exiting stages::
stages:
  - depend
  - build
  - test
  - plot
Up until now we’ve only dealt with triggering pipelines through commits;
however, GitLab offers a number of potential mechanisms by which we can
trigger a pipeline (e.g. via the web, on a scheduler, by a merge request,
etc.). We can even choose to use this in how we may limit which jobs should
be run. In our .tutorial-runner hidden key we will want to update
it to include rules attribute.
.tutorial-runner:
  tags: [nmc-fe1-batch-01]
  rules:
    - if: '$CI_PIPELINE_SOURCE == "web" || $CI_PIPELINE_SOURCE == "schedule"'
      when: always
Rules was introduced in
GitLab server version 12.3. It allow us to define when jobs might be
expected to run. In this case it is only
if the source of the
pipeline’s trigger was either manually via the web or scheduled.
In the case of GitLab web refers to triggering the pipeline using
the Run Pipelines button, found in the CI/CD –> Pipelines
page. Take note that with these rules, even though they are evaluated server
side, you can leverage CI Variables.
We encourage you to look into the upstream documentation for more information
but suffice it to say there is a lot of potential control provided
over jobs with these mechanisms.
Another configuration we wish to leverage is
interruptible.
Also introduced in server version 12.3, interruptible indicates
a job should be canceled if it is made redundant by a newer pipeline.
This is different from the “Auto-cancel redundant pipelines” option
found in Settings –> CI/CD. The later will only cancel a pending
(not running) pipeline.

Taking advantage of interruptible where it makes sense in your CI
can provide immense value, especially when working with the batch executor.
It will allow you to avoid wasting cycles / allocations on already
outdated commits. In our example we are going to add this as well to our
.tutorial-runner hidden key.
.tutorial-runner:
  tags: [nmc-fe1-batch-01]
  rules:
    - if: '$CI_PIPELINE_SOURCE == "web" || $CI_PIPELINE_SOURCE == "schedule"'
      when: always
  interruptible: true
Now that we’ve made necessary changes to existing code, we can start introducing new elements. Up until this point we only have job-level variables but it’s important to note that GitLab offers several places variables can be defined and enforces a priority of environment variables. For building out dependencies we will be using Spack, so let’s just create a global (pipeline) variable that will refer to the repository for our target version of Spack.
variables:
  SPACK_REPO: https://gitlab-ci-token@ecp-training.osti.gov/tutorials/spack.git
You may notice the URL is defined in an unusual manner, just referring
to a gitlab-ci-token user. This is possible due to a change only found
in the HPC enhanced runner. The GIT_ASKPASS
environmental variables is now
defined for jobs in order to support easier and safer usage of git clone
during your CI. As long as the gitlab-ci-token user is specified you will
not need to try and manage any tokens via the command line.
If we review the results from inspecting the available modules presented in the
Hello Environment then we will find that the only missing requirement is
that of bc on the ecp-x86_64 partition. As there exists a package in
Spack we will be using it to install this missing dependency. You don’t
need to understand Spack, only know that it is a package management tool
designed to support multiple versions and configurations of software. We will
be obfuscating any of the complexities with already defined scripts
and configurations that you will leverage.
In our deps:x86_64 job we will be defining a before_script, by doing
so within a job it will be scoped to only appear there. The goal of
this before_script is to git Spack as well as source the necessary
files. Since before_script and script are concatenated into one job
script any environment changes will be observed throughout the job. This is
unlike an after_script which would be executed in a new environment.
For the script we will be leveraging environments to install the required
software at a predefined location on the file system.
For more information on the process please see the
Spack environment
documentation. By leveraging this we can more easily choose a location on
the file system where we want these to be installed and even point to
existing system packages and potential binary mirrors.
deps:x86_64:
  extends:
    - .x86_64-platform
  stage: depend
  before_script:
    - bash ./env/get_spack.bash
    - source ${HOME}/spack/share/spack/setup-env.sh
  script:
    - cd env/nmc
    - spack install
  artifacts:
    paths:
      - env/nmc/spack.lock
If your a Spack user you may note that we are capturing the spack.lock
file as an artifact. This is the concrete information on our environment,
including all installed software versions and their dependencies. By
capturing this file as an artifacts it removes the need for concretizing
the environment again in later jobs.
Define a script, .plot-script for modeling a scientific problem. Using
the details provided in the Hand Coded Heat Application
we will try to determine if the pipes in the wall will freeze. For a complete overview
information/assumption provided to use please see exercise three at the link provided.
.plot-script:
  stage: plot
  script:
    - ./heat runame=wall alpha=8.2e-8 lenx=0.25 dx=0.01 dt=100 outi=100 savi=1000 maxt=55800 bc0=233.15 bc1=294.261 ic="const(294.261)"
    - make plot PTOOL=gnuplot RUNAME=wall
We are generating not only data (wall/*) with our use of the ./heat
command but also an output (wall_plot.png) we should capture these as
artifacts with a small addition to .plot-script.
.plot-script:
  stage: plot
  script:
    - ./heat runame=wall alpha=8.2e-8 lenx=0.25 dx=0.01 dt=100 outi=100 savi=1000 maxt=55800 bc0=233.15 bc1=294.261 ic="const(294.261)"
    - make plot PTOOL=gnuplot RUNAME=wall
  artifacts:
    name: "$CI_JOB_NAME-wall"
    paths:
      - wall_plot.png
      - wall/
Now that we have a script defined for our plot stage,
lets build the two jobs, one each for the ecp-p9-4v100 and
ecp-x86_64 partitions. Starting with plot:x86_64 we need
to not only use the extends key but also account for the missing
package we created earlier (in deps:x86_64). To do this we will
define a before_script
and in this leverage the same Spack instance and environment we
used to deploy the software. In this case we are loading the software
that was already built, adding it to our PATH.
Since we are not using needs in this job, then you might be wondering how do we ensure the correct artifacts are made available? In this case we will also define dependencies. Default behavior with artifacts is to download them from all previous jobs/stages. By passing a list of job names, only the artifacts from there will be downloaded.
plot:x86_64:
  extends:
    - .x86_64-platform
    - .plot-script
  before_script:
    - module load gnuplot
    - source ${HOME}/spack/share/spack/setup-env.sh
    - pushd env/nmc
    - spack load
    - popd
  dependencies:
    - "build:x86_64"
    - "deps:x86_64"
The final job will be adding is plot:ppc64le which is much
simpler than our previous thanks to the existence of the required
modules. This make our before_script a simple one line. We also
need to only specify a single dependencies as we will only require
the artifact from our build:ppc64le job.
plot:ppc64le:
  extends:
    - .ppc64le-platform
    - .plot-script
  before_script:
    - module load gnuplot bc
  dependencies:
    - "build:ppc64le"
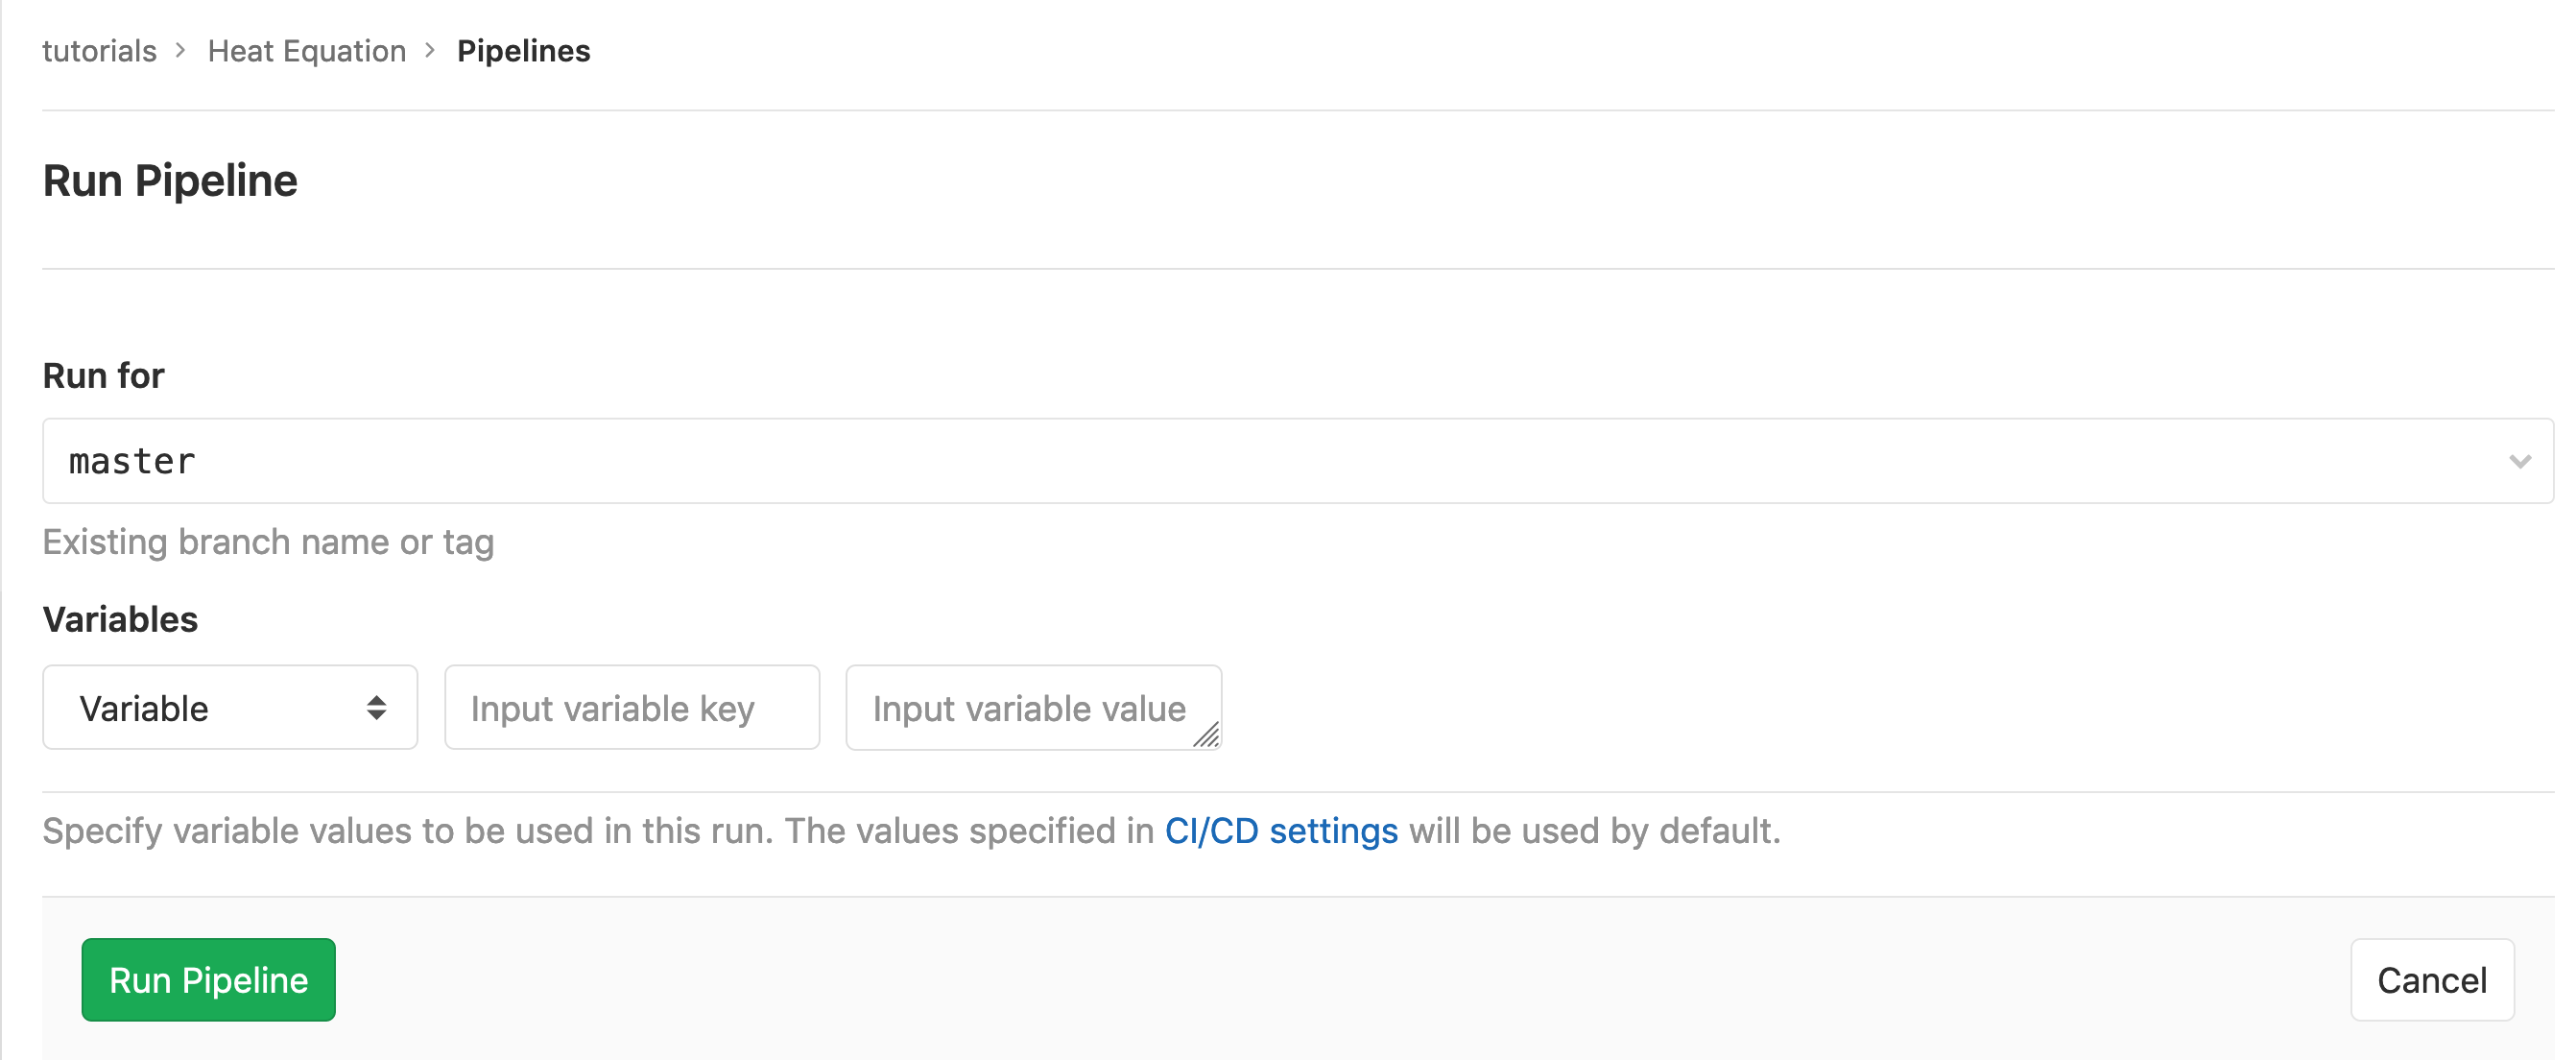
Now that you’ve complete the .gitlab-ci.yml file, please
save/commit the changes. Navigate to the Pipeline page and this time you
will not see that that changes have triggered any new pipeline. This is due
to the rules we defined earlier in the exercise. You will need to trigger
the a job by clicking the Run Pipeline (green) button towards the top of
the page. From there you will be able to select the branch you want to run a
pipeline for:
Completed - Expanded Heat Equation
stages:
  - depend
  - build
  - test
  - plot

.tutorial-runner:
  tags: [nmc-fe1-batch-01]
  rules:
    - if: '$CI_PIPELINE_SOURCE == "web" || $CI_PIPELINE_SOURCE == "schedule"'
      when: on_success
  interruptible: true

.x86_64-platform:
  extends: .tutorial-runner
  variables:
    SCHEDULER_PARAMETERS: "-n 8 -p ecp-x86_64 -t 00:05:00"

.ppc64le-platform:
  extends: .tutorial-runner
  variables:
    SCHEDULER_PARAMETERS: "-n 20 -p ecp-p9-4v100 -t 00:05:00"

.build-script:
  stage: build
  script:
    - module load gcc
    - make
    - ./heat --help
  artifacts:
    name: "$CI_JOB_NAME-$CI_COMMIT_REF_NAME"
    paths:
      - heat

build:x86_64:
  extends:
    - .x86_64-platform
    - .build-script

build:ppc64le:
  extends:
    - .ppc64le-platform
    - .build-script

.test-script:
  stage: test
  script:
    # sanity check
    - ./heat
    - cat heat_results/heat_results_soln_final.curve
    # confirm linear steady state
    - ./heat dx=0.25 maxt=100 ic="rand(125489,100,50)" runame=test
    - cat test/test_soln_00000.curve
    - cat test/test_soln_final.curve

test:x86_64:
  extends:
    - .x86_64-platform
    - .test-script
  needs: ["build:x86_64"]

test:ppc64le:
  extends:
    - .ppc64le-platform
    - .test-script
  needs: ["build:ppc64le"]

variables:
  SPACK_REPO: https://gitlab-ci-token@ecp-training.osti.gov/tutorials/spack.git

deps:x86_64:
  extends:
    - .x86_64-platform
  stage: depend
  before_script:
    - bash ./env/get_spack.bash
    - source ${HOME}/spack/share/spack/setup-env.sh
  script:
    - cd env/nmc
    - spack install
  artifacts:
    paths:
      - env/nmc/spack.lock

.plot-script:
  stage: plot
  script:
    - ./heat runame=wall alpha=8.2e-8 lenx=0.25 dx=0.01 dt=100 outi=100 savi=1000 maxt=55800 bc0=233.15 bc1=294.261 ic="const(294.261)"
    - make plot PTOOL=gnuplot RUNAME=wall
  artifacts:
    name: "$CI_JOB_NAME-wall"
    paths:
      - wall_plot.png
      - wall/

plot:x86_64:
  extends:
    - .x86_64-platform
    - .plot-script
  before_script:
    - module load gnuplot
    - source ${HOME}/spack/share/spack/setup-env.sh
    - pushd env/nmc
    - spack load
    - popd
  dependencies:
    - "build:x86_64"
    - "deps:x86_64"

plot:ppc64le:
  extends:
    - .ppc64le-platform
    - .plot-script
  before_script:
    - module load gnuplot bc
  dependencies:
    - "build:ppc64le"